
Intro
This guide is on bathroom cleaning with vinegar is for homeowners, DIYers, property investors, and contractor-aware consumers who want a practical, low-cost way to maintain a residential bathroom. The goal is simple: use vinegar where it works well, avoid it where it can cause damage, and understand when routine cleaning becomes a repair issue.
The quick answer is that vinegar is effective for routine bathroom maintenance because its mild acidity helps dissolve mineral deposits, hard water scale, and soap scum. It works especially well in toilets, on shower fixtures, and on many non-stone shower surfaces. It is not the right cleaner for every material or every problem, but used correctly, it can handle a large share of regular bathroom cleaning tasks.
Key Considerations Before You Begin
Vinegar works because it contains acetic acid, usually at about 5 percent strength in standard white vinegar. That mild acidity helps loosen calcium deposits, hard water staining, and soap residue. In a bathroom, that makes it most useful on porcelain, ceramic, glass, and many metal fixtures with light to moderate buildup.
Just as important, vinegar has limits. It should not be used on natural stone such as marble, limestone, or travertine because acid can etch the surface and leave permanent dull spots. Repeated soaking can also shorten the life of some grout, caulk, and rubber components. If you are cleaning around older finishes or specialty tile, check the material first rather than assuming vinegar is safe everywhere.
It also helps to separate cleaning from disinfecting. Vinegar can remove grime and reduce some odor-causing residue, but it is not a substitute for a registered disinfectant when sanitation is the priority. For example, if someone in the home has been sick, a cleaner that removes buildup is not the same as a product intended to disinfect high-touch surfaces.
Some common bathroom cleaning combinations improve results when used correctly. Baking soda adds mild abrasion, which helps lift stains in toilet bowls and on textured surfaces. Dish soap helps cut through body oils and soap scum, which is why it is often paired with vinegar for shower cleaning. The combination is useful, but the cleaner still needs enough contact time to work.
Before you start, make sure the bathroom is ventilated. Even a mild cleaner can become unpleasant in a small enclosed room. Run the exhaust fan or open a window so the work is more comfortable and the space dries faster afterward.
Required Tools and Materials

You do not need specialized equipment for routine bathroom cleaning with vinegar. Standard white vinegar is sufficient for most jobs. Cleaning vinegar is stronger, but that added strength is not always necessary and can be harder on finishes if used too aggressively.
For most bathrooms, gather white vinegar, baking soda, and a grease-cutting dish soap. You will also need spray bottles, a toilet brush, non-scratch scrub sponges, microfiber cloths, and a small detail brush or old toothbrush for corners, grout lines, and fixture edges.
A plastic bag and rubber band are useful if you plan to soak a shower head in place. Gloves are also worth having on hand, especially if you will be scrubbing for an extended period or have sensitive skin.
Label any spray bottles clearly. This matters for safety and consistency. It prevents accidental mixing with bleach or other cleaners and makes it easier to repeat the same method the next time you clean.
Step-by-Step Cleaning Process
Step 1: Prepare the Space and Remove Surface Debris

Start by clearing the area. Remove bottles from the shower shelf, bath mats from the floor, and any loose items around the toilet or sink. This gives you full access to the surfaces and reduces the chance of splashing cleaner onto personal items.
Next, remove loose debris such as hair, dust, and visible dirt. This step is easy to overlook, but it matters. If you spray cleaner over loose debris, you create a film that is harder to wipe away and less effective at reaching the mineral deposits underneath.
Rinse the shower walls, tub, or sink with warm water. Warm water helps soften soap scum and surface grime, which allows the vinegar-based cleaner to work more directly on the buildup. In a toilet, flush first so the bowl is freshly wet and easier to coat evenly with vinegar.
Before applying vinegar broadly, identify the actual problem areas. A cloudy shower door usually points to mineral deposits and soap film. A weak shower spray often suggests scale in the shower head. A toilet ring is commonly caused by hard water minerals at the waterline. Knowing what you are trying to remove helps you choose the right method instead of scrubbing everything the same way.
Finally, ventilate the room and spot-test any questionable finish in an inconspicuous area. That is especially important in older homes, where fixture coatings or tile repairs may not match the original materials.
Step 2: Apply Vinegar-Based Cleaning Solutions
For cleaning the toilet with vinegar, pour about 1 to 2 cups of vinegar into the bowl, aiming under the rim and around the waterline where deposits collect. Let it sit for 15 to 30 minutes. The wait time is not optional. It gives the acid time to soften the mineral scale so brushing is easier and more effective.
For toilet cleaning with baking soda, sprinkle baking soda into the bowl after the vinegar has had time to work. Then scrub with a toilet brush, focusing on the waterline, the trap opening, and the underside of the rim. The baking soda helps by adding light abrasion without being harsh enough to damage porcelain.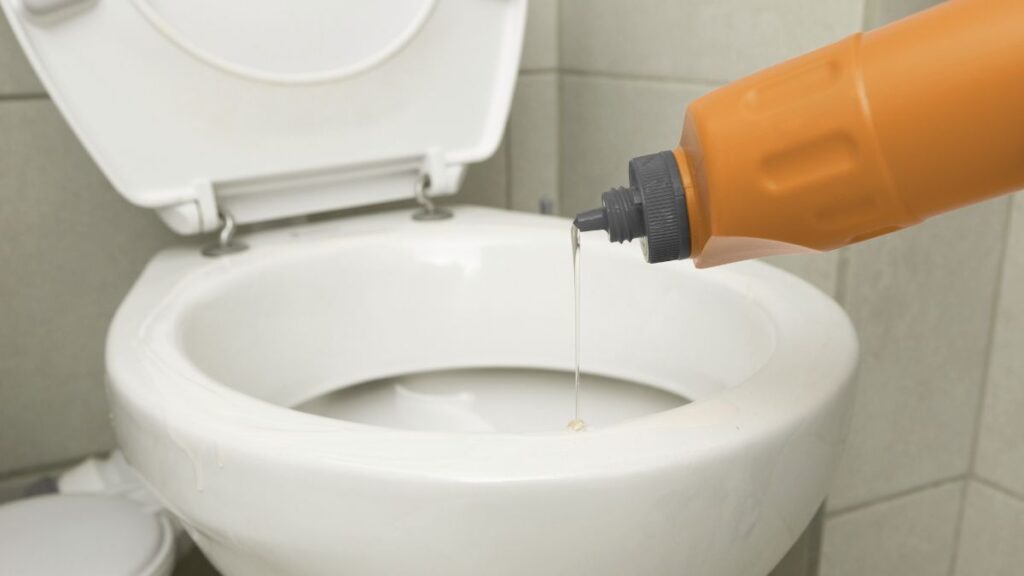
For shower cleaning with vinegar and dawn, mix equal parts white vinegar and dish soap in a spray bottle. Spray the solution onto shower walls, glass, metal trim, and other non-stone surfaces with soap scum or hard water haze. Let it sit for 10 to 20 minutes before scrubbing. The dish soap helps break down oily residue, while the vinegar targets the mineral portion of the buildup.
For cleaning the shower with baking soda and vinegar, use a different approach on stubborn spots. Apply a paste made from baking soda and a small amount of water to the problem area first. Then spray vinegar over it and scrub gently. This is useful on soap dishes, corners, textured shower floors, and other places where residue builds up in layers.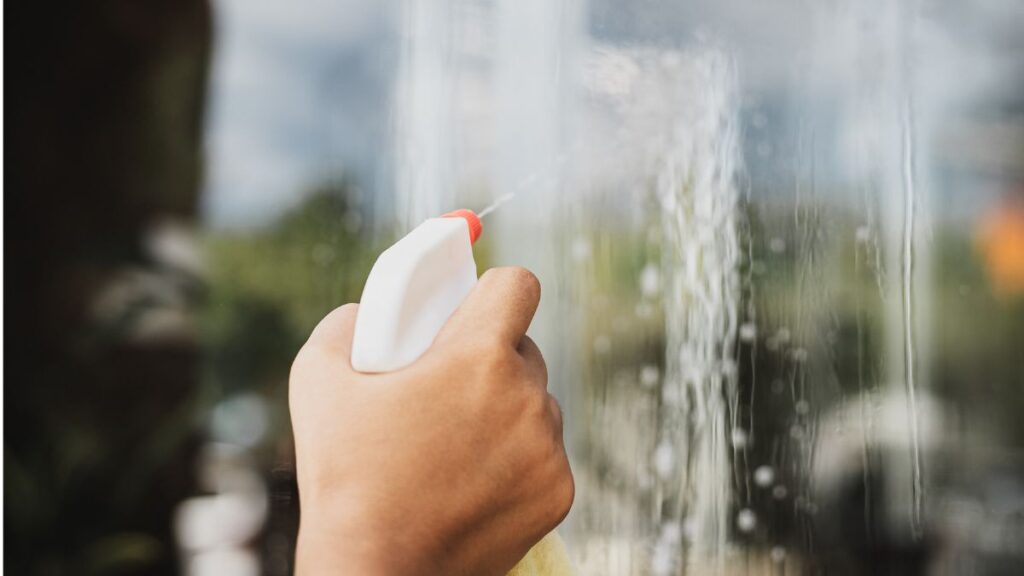
For cleaning shower head with vinegar, fill a plastic bag with enough vinegar to submerge the spray nozzles, secure it around the shower head, and let it soak for several hours or overnight. This method works well when mineral buildup is restricting spray flow. After soaking, remove the bag, scrub the nozzles lightly with a brush, and run hot water through the fixture to flush out loosened scale.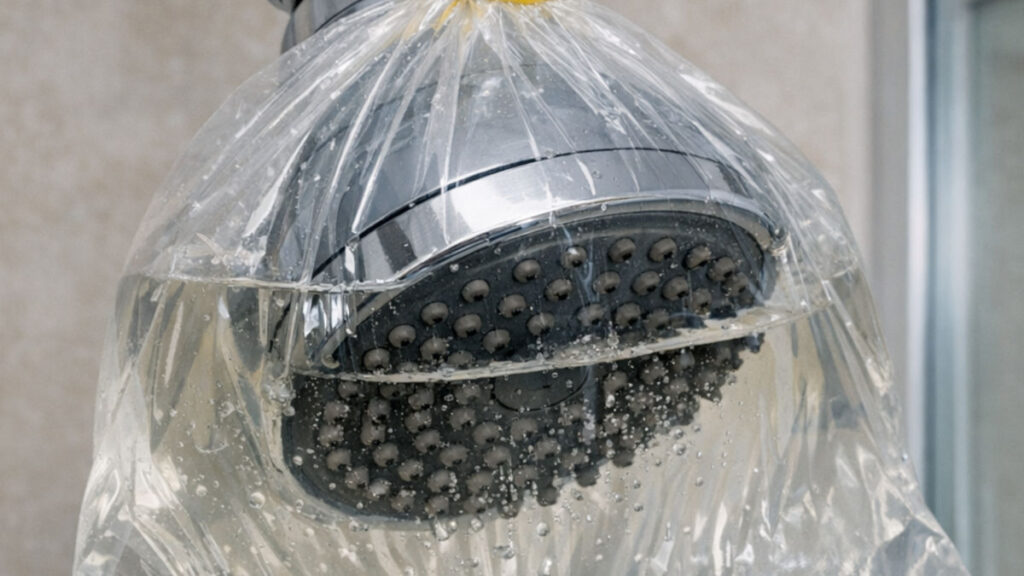
Step 3: Scrub Surfaces, Rinse Thoroughly, and Dry
Once the cleaners have had time to work, scrub with the right tool for the surface. Use a toilet brush in the bowl, a non-scratch sponge on tubs and shower walls, and a small detail brush where grime collects around fixture bases, grout joints, and corners. Matching the tool to the surface helps avoid scratches that can trap dirt later.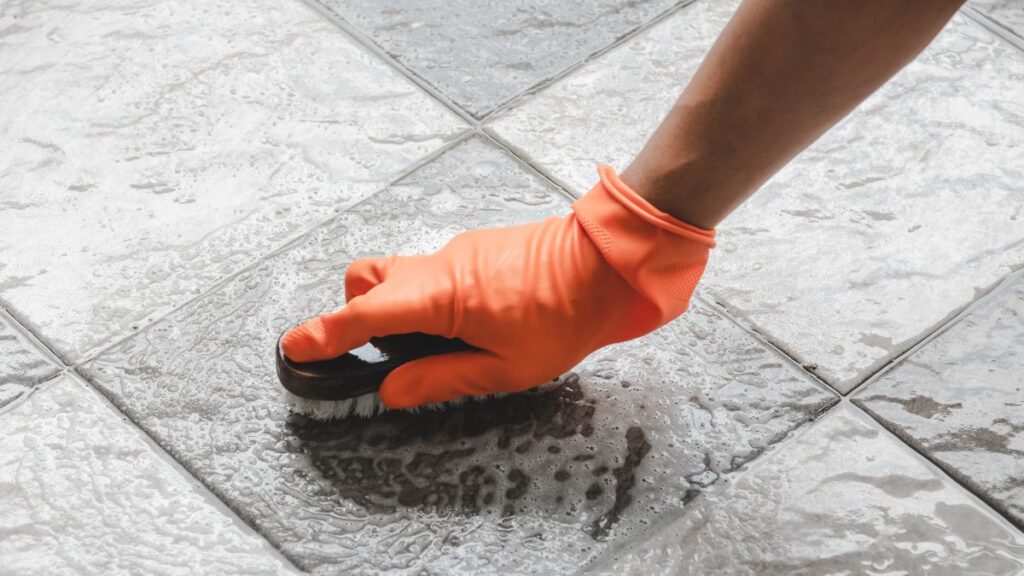
After scrubbing, rinse every cleaned surface thoroughly with clean water. This is one of the most important steps for a good finish. Leftover soap and vinegar residue can leave streaks on glass, dull the appearance of metal fixtures, and attract fresh dirt more quickly.
Dry the surfaces with a microfiber cloth rather than letting them air dry. This improves the appearance immediately and helps prevent new water spots from forming on shower doors, faucets, and tile. In practical terms, drying extends the visible results of the cleaning you just did.
Finish by running water through any cleaned fixture, especially a shower head that has been soaked. If debris loosened during cleaning, flushing it out now prevents it from settling back into the nozzles.
Mistakes to Watch Out For
A common mistake is using vinegar on materials that do not tolerate acid well. Natural stone is the clearest example, but it is not the only one. Some specialty finishes, grout repairs, and older sealants can also be affected by repeated exposure. If you are unsure what a surface is made of, verify that first.
Another frequent problem is expecting instant results. Vinegar works best when it is given time to dissolve mineral deposits. Spraying it on and wiping it off immediately often leads people to conclude that it does not work, when the real issue is that it was not left in place long enough.
It is also easy to overdo the scrubbing. Acrylic tubs, fiberglass surrounds, and plated metal fixtures can be scratched by harsh pads or aggressive brushing. Once the surface is scratched, it becomes harder to keep clean because residue clings to the damaged finish more easily.
Mixing cleaning products is a more serious mistake. Vinegar should never be mixed with bleach. That reaction can release chlorine gas, which is dangerous even in a small bathroom. For the same reason, do not reuse unlabeled spray bottles or combine leftover cleaners casually.
Finally, do not treat vinegar as a solution for every bathroom problem. If staining returns quickly, odors persist, or fixture performance does not improve after cleaning, the issue may be mechanical or moisture-related rather than cosmetic.
Safety Practices and Basic Code Considerations
From a basic safety standpoint, use gloves, ventilate the room, and keep products clearly labeled. Those are simple steps, but they reduce the most common household cleaning problems: skin irritation, accidental mixing, and poor air quality during use.
Ventilation also matters from a building performance standpoint. U.S. bathrooms are generally expected to have either an operable window or mechanical exhaust to control moisture. While that is a broader code issue than cleaning alone, it directly affects maintenance. Bathrooms that stay damp longer are more likely to develop mildew, staining, and deteriorated caulk.
Be mindful of repeated exposure on seals, caulk joints, grout, and fixture finishes. Vinegar is generally safe in moderate household use, but frequent soaking of the same areas can shorten the life of vulnerable materials. Cleaning should support maintenance, not gradually damage the parts that keep water contained.
For homes with septic systems, moderate household use of vinegar is generally not a concern. The larger issue is avoiding excessive dumping of cleaning solutions of any type into the plumbing system. Regular residential cleaning is one thing. Treating drains or fixtures repeatedly with large volumes of product is another.
In older homes, especially those with aging plumbing fixtures or unknown past repairs, it is worth watching for corrosion, loose trim, cracked caulk, or failing grout while you clean. Cleaning often reveals maintenance issues that were not obvious before. That is useful information, but it also means some bathrooms need repair rather than more aggressive cleaning.
Frequently Asked Questions
Is vinegar safe for all bathroom surfaces?
No. It is generally safe on porcelain, ceramic, glass, and many non-stone shower surfaces, but it should not be used on natural stone such as marble or travertine. It can also weaken some caulk, grout, and rubber parts with repeated exposure.
How often should I clean a bathroom with vinegar?
For routine maintenance, once a week is usually enough in a regularly used bathroom. High-use bathrooms may need more frequent attention, especially if hard water causes mineral deposits to form quickly.
Does vinegar disinfect as well as a commercial disinfectant?
No. Vinegar helps remove buildup and can reduce some odor and residue, but it should not be treated as a full disinfectant. If sanitation is the goal, use a product specifically intended for that purpose.
Can I leave vinegar in the toilet overnight?
Yes, especially for mineral staining or a stubborn toilet ring. That said, overnight soaking is usually not needed for regular weekly cleaning. It is better used as an occasional treatment for buildup.
What ratio works best for shower cleaning with vinegar and dish soap?
A 1:1 ratio is a practical starting point for most shower surfaces. If the finish is delicate or the residue is light, you can dilute the mix slightly with water and still get good results.
What if cleaning the shower head with vinegar does not restore water flow?
If soaking and flushing do not improve the spray pattern, the buildup may be too severe, or the problem may be deeper in the fixture or supply line. At that point, replacement or a plumbing evaluation may make more sense than repeated soaking.
Do I need baking soda for toilet cleaning?
Not always. Vinegar alone can help loosen mineral deposits, but baking soda improves scrubbing and can help with odor control. It is a useful addition, not a requirement.
Will vinegar damage grout or caulk?
Occasional use is usually manageable, but repeated saturation can shorten the life of grout and caulk. If those materials are already cracked, loose, or deteriorated, cleaning will not fix the underlying problem.
Final Recommendations and When Professional Help Is Needed
Used properly, vinegar is a practical maintenance cleaner for toilets, showers, and many bathroom fixtures. It works best when the goal is to remove routine mineral deposits, soap scum, and light staining before those problems become heavy buildup.
It is less effective when the issue is no longer surface-level. Persistent odors, recurring toilet stains, chronic mildew, weak shower pressure, or repeated caulk and grout failure usually point to a larger problem. In those cases, more cleaning is often the wrong solution.
A good rule is to stay in the DIY lane when you are dealing with ordinary residue on compatible surfaces. Move toward professional help when you see signs of water intrusion, mold beyond the surface, damaged finishes, plumbing performance problems, or repeated staining that returns soon after cleaning.
That distinction matters because bathroom maintenance is not just about appearance. A clean surface can still hide a failed seal, a venting issue, or a slow leak. The most informed approach is to use vinegar where it makes sense, avoid it where it can cause damage, and recognize when cleaning has done all it can do.