 Introduction
 Introduction
Bathroom ventilation is a functional requirement in any home. Moisture from showers and daily use accumulates quickly, and without proper removal, it can damage paint, drywall, and structural materials over time.
A bathroom exhaust fan wall mount is often used when ceiling installation is not practical. This is common in homes without attic access, slab-on-grade construction, or retrofit situations where opening ceilings is disruptive or costly.
This guide explains how wall-mounted exhaust fans work, when they are the right choice, and how to size, install, and maintain them properly. It also addresses common mistakes and code considerations so you can make informed decisions.
What a Wall-Mounted Bathroom Exhaust Fan Does
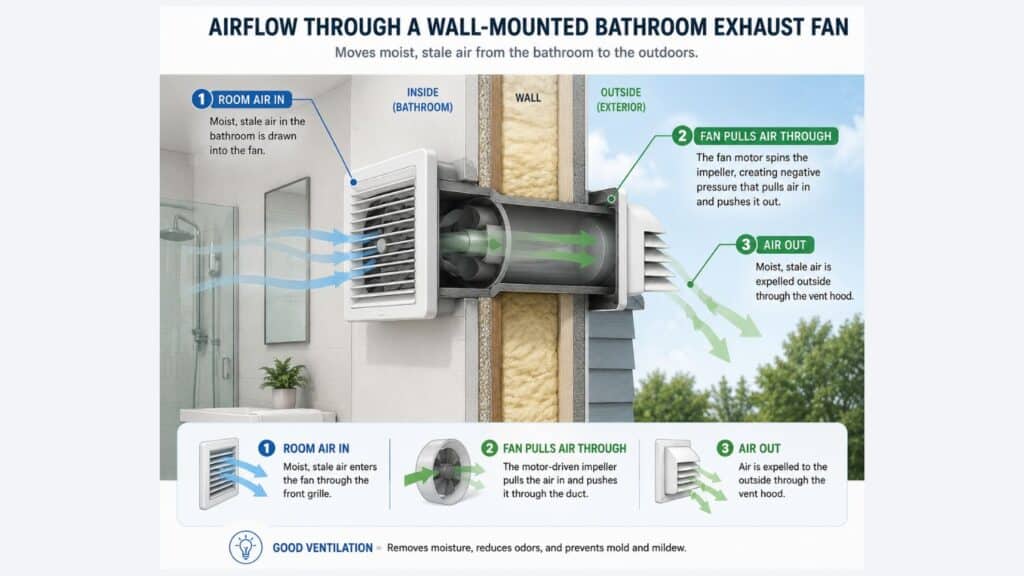 A wall-mounted bathroom exhaust fan removes humid air directly through an exterior wall. Instead of routing ductwork through a ceiling and attic, the unit vents horizontally to the outside.
The system typically includes a motor, housing, interior grille, and an exterior vent cap with a damper. The damper prevents outside air from entering when the fan is off.
Compared to ceiling-mounted units, wall-mounted fans simplify installation in certain layouts. However, they require access to an exterior wall and careful placement to perform effectively.
Why Homeowners Choose a Bathroom Exhaust Fan Wall Mount
Moisture Control and Mold Prevention
Bathrooms generate high humidity in a short period. Without proper ventilation, moisture settles into surfaces and can lead to mold growth behind walls or under paint.
A correctly sized and positioned fan removes moisture at the source. This reduces the risk of long-term damage such as warped trim, peeling finishes, and hidden mold.
Improved Indoor Air Quality
In addition to moisture, these fans remove odors and airborne particles from cleaning products. This is especially important in smaller bathrooms where air circulation is limited.
Consistent airflow helps maintain a healthier indoor environment and prevents stale air from lingering.
Simplified Installation in Certain Homes
In homes without attic access, installing a ceiling fan often requires major structural work. A wall-mounted unit avoids this by venting directly through the exterior wall.
This makes it a practical option for remodels, rental properties, and situations where minimizing disruption is important.
Shorter and More Efficient Ducting
Short duct runs reduce airflow resistance. With fewer bends and less friction, the fan can operate closer to its rated capacity.
This also lowers the chance of condensation forming inside the duct, which can otherwise lead to moisture issues.
When a Wall-Mounted Exhaust Fan Makes Sense
 A wall-mounted fan is most effective when the bathroom has direct access to an exterior wall. Placement near the shower or tub improves performance by capturing moisture at the source.
These units are commonly used in older homes where ceiling modifications are difficult. They also work well in powder rooms where ventilation needs are moderate.
However, they are not suitable for bathrooms located in the center of a home unless ducting can reach an exterior wall efficiently. Long horizontal runs can reduce effectiveness if not designed carefully.
Features That Matter Before You Buy
Airflow Capacity (CFM)
Airflow is measured in cubic feet per minute. A common guideline is 1 CFM per square foot of bathroom space.
For example, a 60 square foot bathroom typically requires at least a 60 CFM fan. Bathrooms with showers, tubs, or higher moisture levels may need additional capacity.
Noise Level (Sones)
Noise affects how often the fan is used. Fans rated at 1.5 sones or lower are generally quiet enough for regular use.
Louder units often get turned off too soon, which reduces their ability to remove moisture effectively.
Energy Efficiency
Efficient motors use less electricity and tend to last longer. ENERGY STAR rated models are designed to meet higher efficiency standards.
Over time, this reduces operating costs and improves reliability.
Durability and Materials
Bathroom environments expose components to constant humidity. Corrosion-resistant materials and sealed motors perform better over time.
Lower-quality units may fail prematurely due to moisture exposure.
Backdraft Protection
A built-in damper prevents outside air from entering when the fan is off. Without this feature, cold air and humidity can move back into the bathroom.
This can also increase energy loss during colder months.
Additional Features
Some models include lighting, heaters, or humidity sensors. While useful, these features increase installation complexity and may require additional electrical capacity.
Sizing the Fan for Proper Performance
Proper sizing is critical to effective ventilation. An undersized fan will not remove moisture fast enough, while an oversized unit may create unnecessary noise without improving results.
Start with the basic square footage calculation, then adjust for usage. Bathrooms with heavy moisture use, such as daily showers, often benefit from higher capacity.
For example, a medium-sized bathroom with a shower and tub may require 80 to 100 CFM to keep humidity under control.
Installing a Bathroom Exhaust Fan Wall Mount
Planning the Location
 Planning the Location
Choose a location near the main moisture source. Avoid placing the fan too far from the shower or tub, as this reduces effectiveness.
Check for wall studs, plumbing, and wiring before cutting. This prevents costly mistakes during installation.
Cutting the Wall Opening
Interior drywall is straightforward to cut, but exterior materials such as brick or stucco require proper tools and care.
Improper cuts can lead to water intrusion or structural issues, especially if the exterior finish is not sealed correctly.
Mounting and Securing the Unit
The fan housing must be securely attached to framing. Loose installations can cause vibration and noise during operation.
Proper alignment ensures the fan operates efficiently and quietly.
Ducting and Exterior Vent
Keep duct runs short and direct. Avoid unnecessary bends that restrict airflow.
Install an exterior vent cap with a damper and seal all joints to prevent leaks and moisture entry.
Electrical Connections
Turn off power before making any connections. Wiring must follow local electrical codes, including grounding and proper switch installation.
If a new circuit is required, this is typically a job for a licensed electrician.
Sealing and Final Checks
Seal around the housing and exterior vent to prevent air leaks and water intrusion. This step is often overlooked but critical for long-term performance.
Test the fan after installation to confirm airflow and check for unusual noise.
Common Installation Mistakes to Avoid
One of the most serious mistakes is venting into a wall cavity instead of outside. This traps moisture and can lead to hidden mold and structural damage.
Using long or flexible ducting unnecessarily reduces airflow. Poor sealing around the exterior vent can also allow water and air leaks.
Incorrect sizing is another frequent issue. Many homeowners install fans that are too small for the space, leading to persistent humidity problems.
Maintenance and Exhaust Fan Bathroom Cleaning
Why Cleaning Matters
 Why Cleaning Matters
Dust buildup reduces airflow and forces the motor to work harder. Over time, this can lead to reduced performance or failure.
How Often to Clean
Most fans should be cleaned every 6 to 12 months. Homes with heavy use may require more frequent maintenance.
Cleaning Steps
Turn off power at the breaker. Remove the grille and clean it with mild soap.
Use a vacuum or brush to remove dust from the fan blades and housing. Avoid bending components during cleaning.
Signs of Problems
If the fan becomes louder, moves less air, or fails to clear humidity, cleaning or replacement may be needed.
Troubleshooting Common Problems
Fan Not Working
Check the circuit breaker, switch, and wiring connections. Electrical issues may require professional repair.
Weak Airflow
This is often caused by clogged ducts or a dirty fan. Inspect the exterior vent for blockages.
Excessive Noise
Noise can result from loose mounting or worn motor components. Tightening or replacing the unit may be necessary.
Backdraft Issues
If outside air enters the bathroom, the damper may be missing or not functioning properly. Replacing the vent cap usually resolves this.
Costs and Long-Term Value
Wall-mounted exhaust fans typically range from $50 to $250 depending on features and build quality.
Installation costs vary based on complexity. Simple replacements may be handled by homeowners, while new installations involving electrical work or masonry cutting can be significantly higher.
Proper ventilation helps prevent expensive repairs related to mold and moisture damage, making it a practical long-term investment.
Code Requirements and Safety Considerations
Building codes generally require bathroom exhaust fans to vent directly outdoors. Venting into attics or wall cavities is not allowed.
Minimum airflow requirements typically start at 50 CFM for intermittent use. Ducts should be short, sealed, and properly supported.
Electrical work must meet safety standards, including grounding and, in some cases, GFCI protection. Exterior vents must include a damper and be sealed to prevent water intrusion.
Permits may be required depending on the scope of work. Always check local regulations before starting installation.
Wall-Mounted vs Ceiling-Mounted Fans
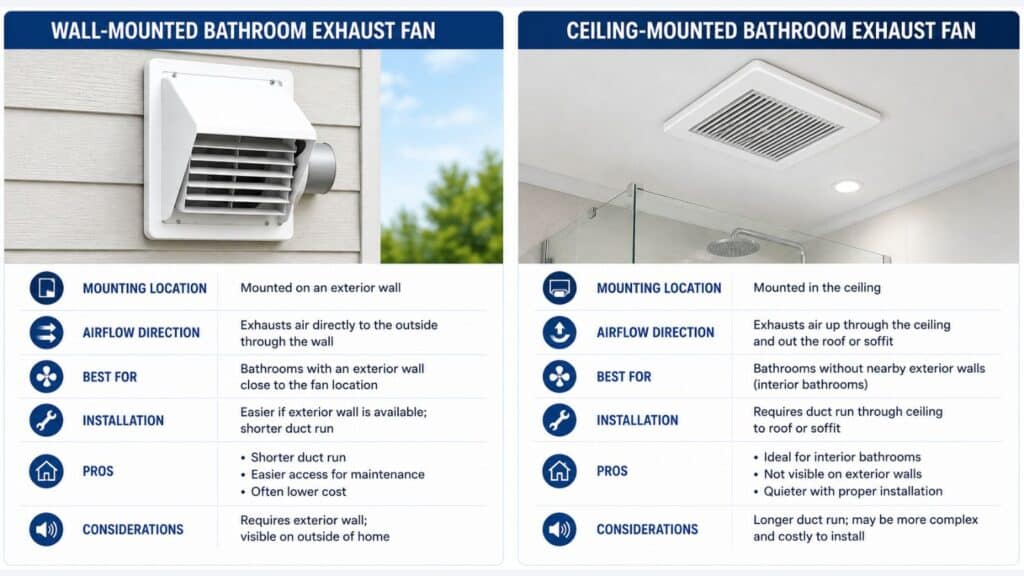 Wall-mounted fans are easier to install when attic access is limited and provide efficient direct venting.
Ceiling-mounted units offer more flexibility in placement but often require longer duct runs, which can reduce efficiency if not installed properly.
The right choice depends on the layout of the home and the complexity of installation.
Best Practices for Reliable Performance
Run the fan during showers and for at least 15 to 20 minutes afterward to remove residual moisture.
Using a timer or humidity sensor helps ensure consistent operation. Inspect the exterior vent periodically to confirm it opens and closes properly.
Regular cleaning and inspection keep the system working efficiently and extend its service life.
Conclusion
A bathroom exhaust fan wall mount is a practical solution when ceiling installation is not feasible. It provides effective moisture control when properly sized, installed, and maintained.
Understanding airflow requirements, installation constraints, and code considerations helps prevent common problems. With the right approach, homeowners can improve indoor air quality and protect their property from moisture-related damage.