Choosing the right edge profile is not just a design decision. It affects durability, maintenance, fabrication cost, and long-term resale appeal. For homeowners, investors, and contractor-aware consumers in the U.S., the question is less about style and more about performance.
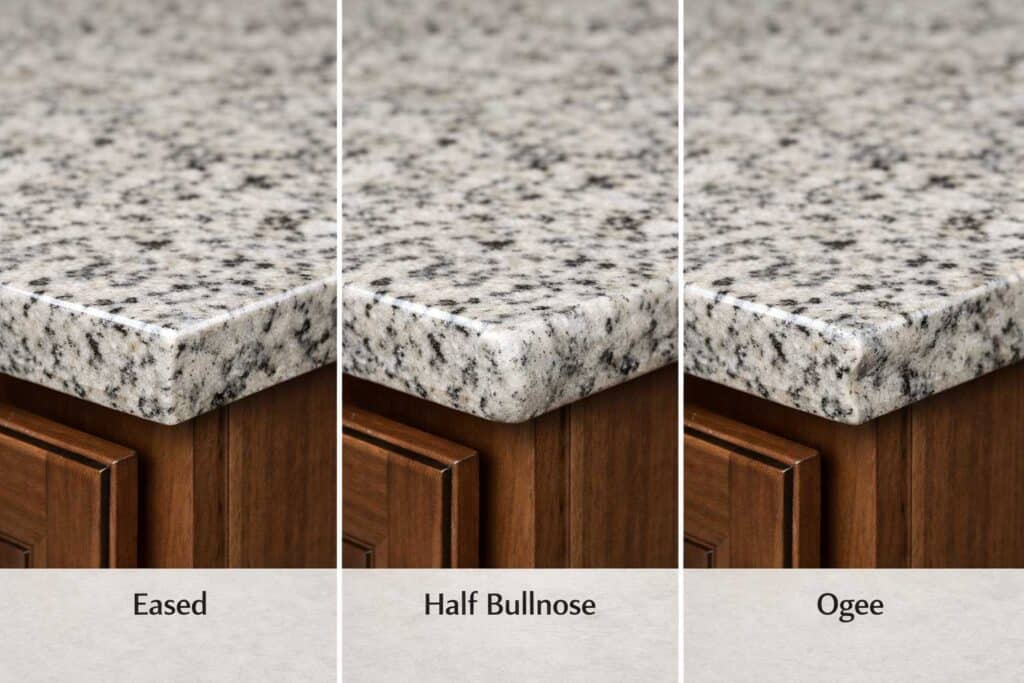
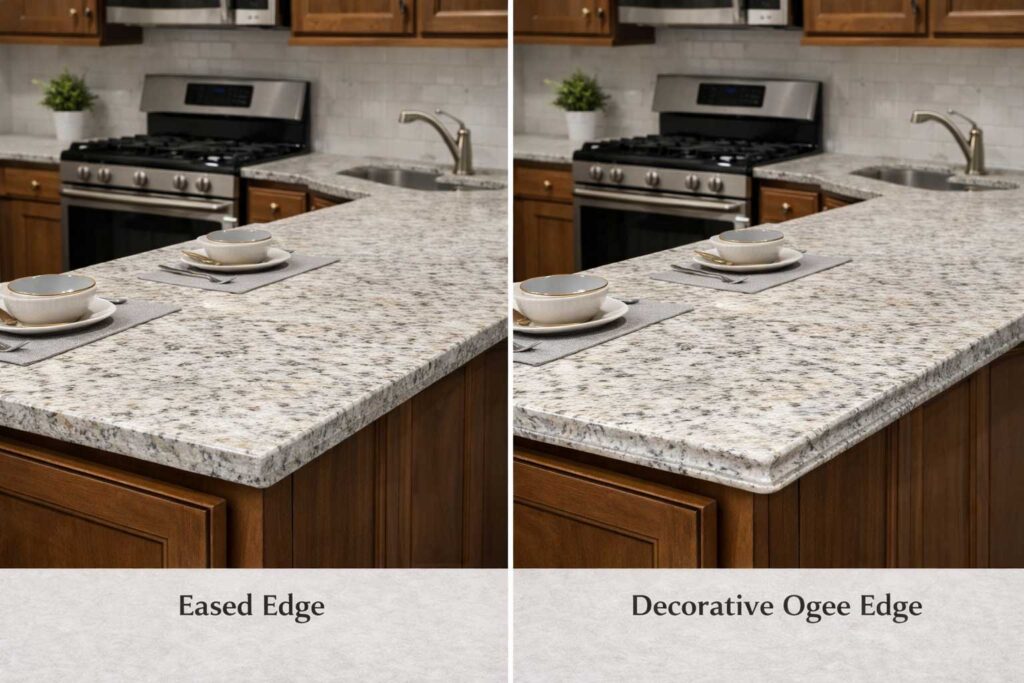
The short answer is that an eased edge or half bullnose is the best choice for most granite countertops. These profiles reduce chipping risk, clean easily, cost less to fabricate than ornate profiles, and appeal to the widest range of buyers. Decorative edges such as ogee can work in traditional kitchens, but they increase labor time, polishing complexity, and maintenance.
Understanding why certain edges perform better requires looking at how granite behaves, how fabrication works, and how kitchens are actually used.
Key Considerations Before Choosing a Countertop Edge
The shaped front detail of a countertop is called the edge profile. On granite, the profile is cut directly into the slab using diamond tooling and then polished to match the factory finish. On laminate, the edge is routed and bonded over a wood-based core.
Granite is extremely strong under compression but brittle at thin edges. A sharp square edge concentrates impact force into a small corner. When a heavy pot strikes that corner, the stone can chip. A slightly rounded or eased edge spreads that force across a broader surface, reducing localized stress.
This is why the eased edge remains the most popular granite edge in the United States. It removes the fragile sharpness without dramatically changing the slab’s visual thickness. The half bullnose performs similarly but adds a more visible curve.
Edge choice also affects cleaning. Deep decorative contours, such as ogee profiles, require multiple polishing passes during fabrication and create crevices that collect debris. In busy family kitchens or rental properties, simpler edges reduce long-term maintenance.
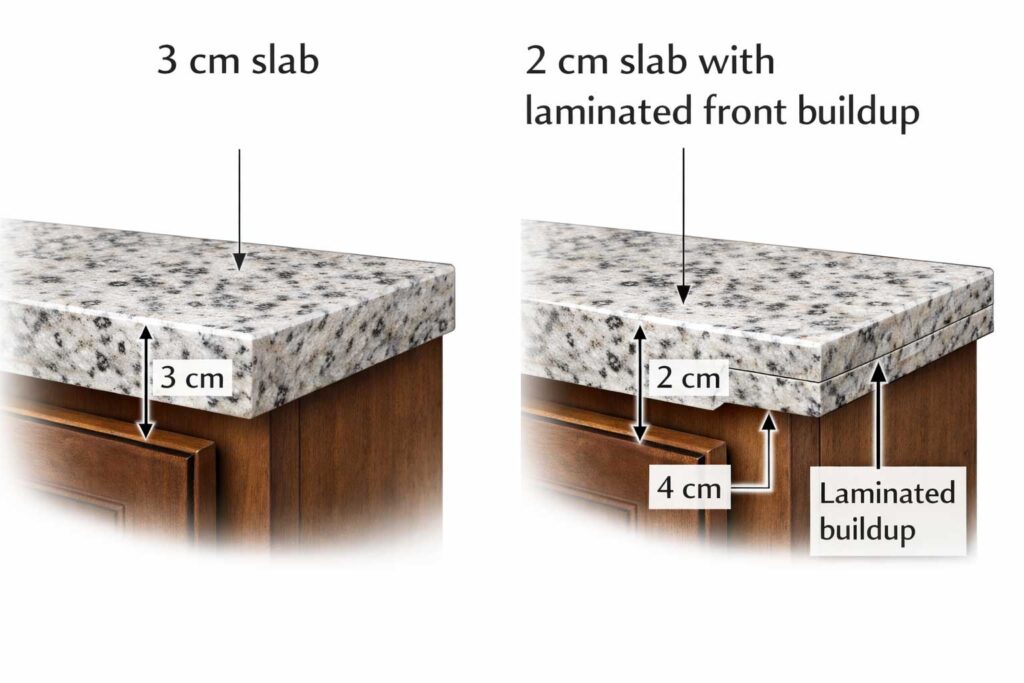
Slab thickness matters. Most residential installations use 3 cm granite, which provides sufficient strength for standard spans. With 2 cm granite, fabricators often laminate a strip along the front edge to simulate a thicker slab. More elaborate profiles increase labor because the laminated buildup must be shaped and polished seamlessly. That additional labor directly affects cost.
From a resale perspective, neutral edges age better. A highly ornate profile can make a kitchen feel tied to a specific era. An eased edge blends across cabinet styles and design trends.
For laminate countertops, the most durable option is typically a rounded postformed edge. It wraps the laminate surface over the front lip, reducing exposed seams where moisture can penetrate.
Required Tools and Materials
Granite Edge Fabrication
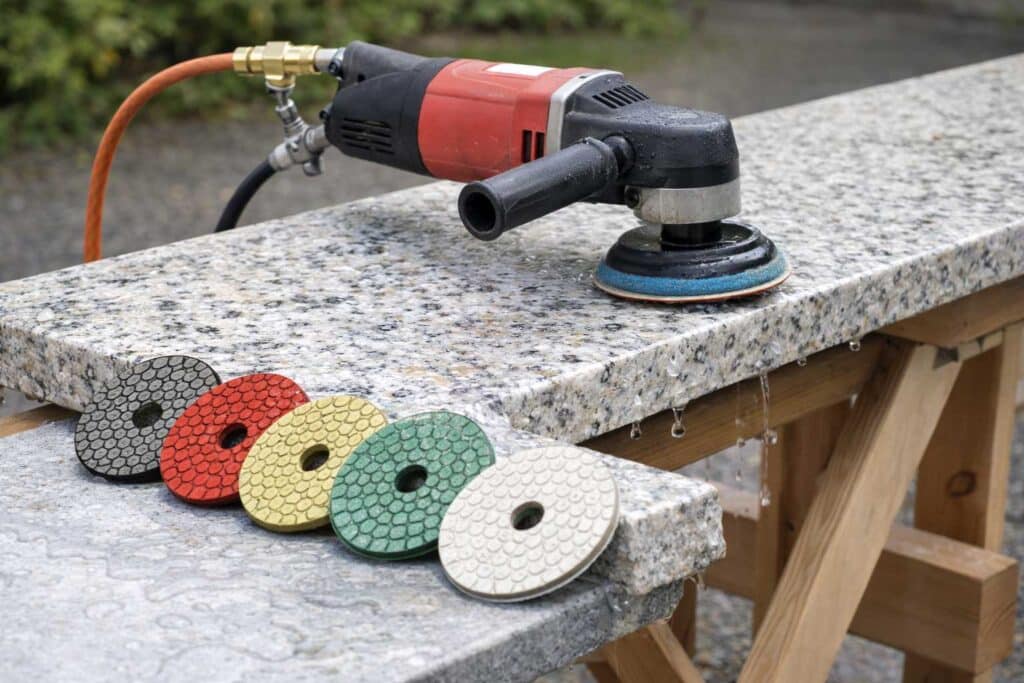
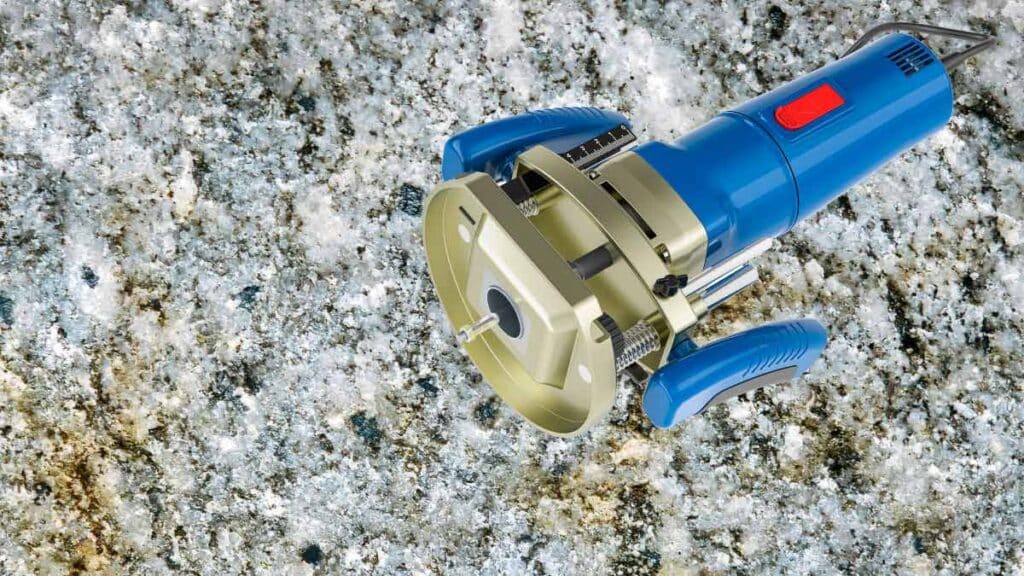
Granite edge fabrication requires a diamond profiling wheel matched to the selected shape. After shaping, the edge is polished through a sequence of diamond pads, often ranging from coarse grinding to fine polishing grits.
Each polishing stage removes scratches left by the previous grit. Skipping a grit can result in visible reflection distortion under kitchen lighting. Dark granites are especially unforgiving, as inconsistencies in polish show more clearly.
Water is used during cutting and polishing to control dust and prevent overheating. Silica dust generated by dry grinding poses serious respiratory hazards, which is why professional shops use wet systems and dust control measures.
Achieving a factory-matched polish on an installed countertop is difficult. Even experienced technicians must carefully blend transitions to avoid visible dull bands. This is one reason on-site edge modification is rarely recommended for homeowners.
Laminate Countertop Work
Laminate edges require a router with an appropriate bit, a flush trim bit, laminate sheets, contact cement, a J roller, masking tape, and hand files.
Adhesive technique determines long-term durability. Contact cement must reach proper tack before bonding. If joined too early, the bond can fail. If pressure is uneven, voids form beneath the laminate and eventually lead to edge lifting.
Unlike granite fabrication, laminate work does not involve structural stone shaping. However, accuracy and sequencing still matter.
How to Select and Finish a Countertop Edge
Step 1 – Evaluate and Select the Appropriate Edge Profile
Begin with function. In kitchens with frequent cooking and heavy cookware, avoid sharp square edges. Chipped granite edges often occur near sink cutouts or island corners where traffic is highest. A professional chip repair service call commonly ranges from $150 to $300, depending on color matching and location.
Match the edge to the cabinetry and layout. Flat-panel cabinets and contemporary designs typically pair best with eased edges. Traditional raised-panel cabinetry can support ogee profiles without appearing mismatched.
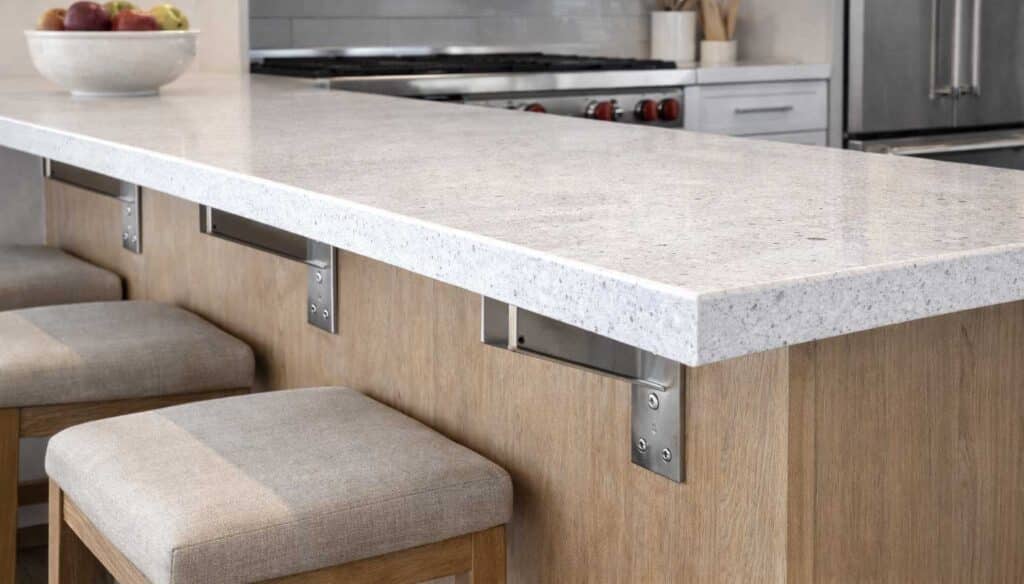
Consider structural context. If planning a large island overhang, confirm support strategy before finalizing the edge. Edge selection does not increase load capacity. Brackets or corbels should be planned before templating.
For laminate countertops, rounded edges reduce moisture exposure at the front seam. This is particularly important near dishwashers and sink areas where steam and water are common.
Step 2 – Prepare the Surface and Layout for Edge Work
For granite, preparation occurs during fabrication. After cutting the slab to size, the fabricator secures it on a stable surface and marks the profile path. Precision here ensures consistent curvature across long runs and mitered corners.
Mitered waterfall edges, often used in modern kitchens, require even greater precision. The visible seam must align perfectly, and the edge polish must match across adjoining pieces.
Attempting to modify an installed granite edge introduces challenges. Matching the original polish, controlling dust, and maintaining consistent geometry are complex tasks. Professional intervention is strongly advised.
For laminate, start with a flat and securely fastened substrate. Uneven surfaces lead to seam gaps and premature failure. Apply edge strips first if building up a rounded edge. Allow adhesive to reach proper tack, then apply firm, even pressure with a J roller.
Step 3 – Shape, Refine, and Inspect the Finished Edge
Granite shaping begins with the profiling wheel. Polishing then progresses through sequential grits. Each pass removes prior scratches. Rushing this process leads to visible swirl marks under overhead lighting.
After polishing, inspect corners and sink cutouts carefully. Small chips are easier to repair before sealing. The finished edge should reflect light evenly along its entire length.
For laminate, trim excess material using a flush trim bit while maintaining steady router speed. Inconsistent movement can burn or chip the laminate surface.
When filing, always move downward toward the substrate. Filing upward risks lifting and fracturing the decorative layer. After smoothing, inspect seams and edges for gaps or voids.
Mistakes That Lead to Poor Edge Performance
A common mistake is assuming all edges perform equally. Decorative profiles require additional tooling passes and polishing time, increasing fabrication cost without improving durability.
Another mistake is installing sharp square edges in high-traffic kitchens. Island corners are particularly vulnerable. Repeated impact in these areas leads to cumulative edge damage.
Homeowners also underestimate slab thickness limitations. Complex profiles on 2 cm granite require laminated buildup, which increases labor and introduces additional seams.
DIY reshaping of granite edges with handheld grinders often produces uneven geometry and mismatched polish. Once the surface reflection is distorted, restoring uniform gloss is difficult.
With laminate, inadequate adhesive coverage or insufficient rolling pressure results in edge lifting within months. Filing in the wrong direction damages the finished surface and exposes the core.
Safety Practices and Structural Guidelines
Granite cutting and polishing generate respirable crystalline silica. Dry grinding in enclosed garages without proper respiratory protection poses real health risks. Wet cutting systems and appropriate respirators reduce exposure.
Wet polishers should be connected to GFCI-protected outlets to reduce electrical shock hazards when water is present.
Structural support planning is essential before fabrication. A typical unsupported overhang for 3 cm granite is approximately 10 to 12 inches. Larger spans require steel brackets or corbels. These decisions should be made before templating, not after installation.
For laminate installation, ensure adequate ventilation when using solvent-based contact cement. Adhesive fumes are flammable and harmful in confined spaces.
In rental properties, rounded edges may reduce liability exposure related to impact injuries in tight walkways.
Frequently Asked Questions About Countertop Edges
What is the edge of a countertop called?
It is called the edge profile, referring to the shaped and finished perimeter detail of the countertop.
What is the most popular granite edge?
The eased edge remains the most common because it balances durability, fabrication efficiency, and visual neutrality across cabinet styles.
What is the most popular countertop edge overall?
Across granite and quartz installations in the U.S., the eased edge continues to dominate due to its performance and broad appeal.
What edge is best for granite countertop durability?
Eased and half bullnose edges typically perform best because they reduce sharp, chip-prone corners without increasing maintenance complexity.
What is the best edge for laminate countertops?
A rounded postformed edge is usually the most durable and moisture-resistant option for laminate surfaces.
Can you change the edge on an existing granite countertop?
Yes, but it requires professional grinding and repolishing. Results depend on slab thickness, existing seams, and the ability to match the original finish.
Does edge style affect resale value?
Yes. Simple, neutral profiles generally appeal to more buyers than ornate or highly customized edges, especially in mid-range properties.
Practical Takeaways and When Professional Help Is Necessary
Finalize edge selection before granite fabrication begins. Once the slab is cut and polished, changing the profile becomes expensive and technically challenging.
Professional fabrication is recommended for any granite edge shaping or modification. The risk of cracking, polish mismatch, and visible defects is significant without specialized equipment.
Consult a contractor or structural professional when island overhangs exceed typical unsupported limits. Support planning must precede installation.
Laminate edge work is manageable for experienced DIYers, but proper adhesive technique and careful routing determine longevity.
For most U.S. kitchens, a simple eased or gently rounded edge provides the most reliable combination of durability, ease of maintenance, fabrication efficiency, and long-term market appeal.